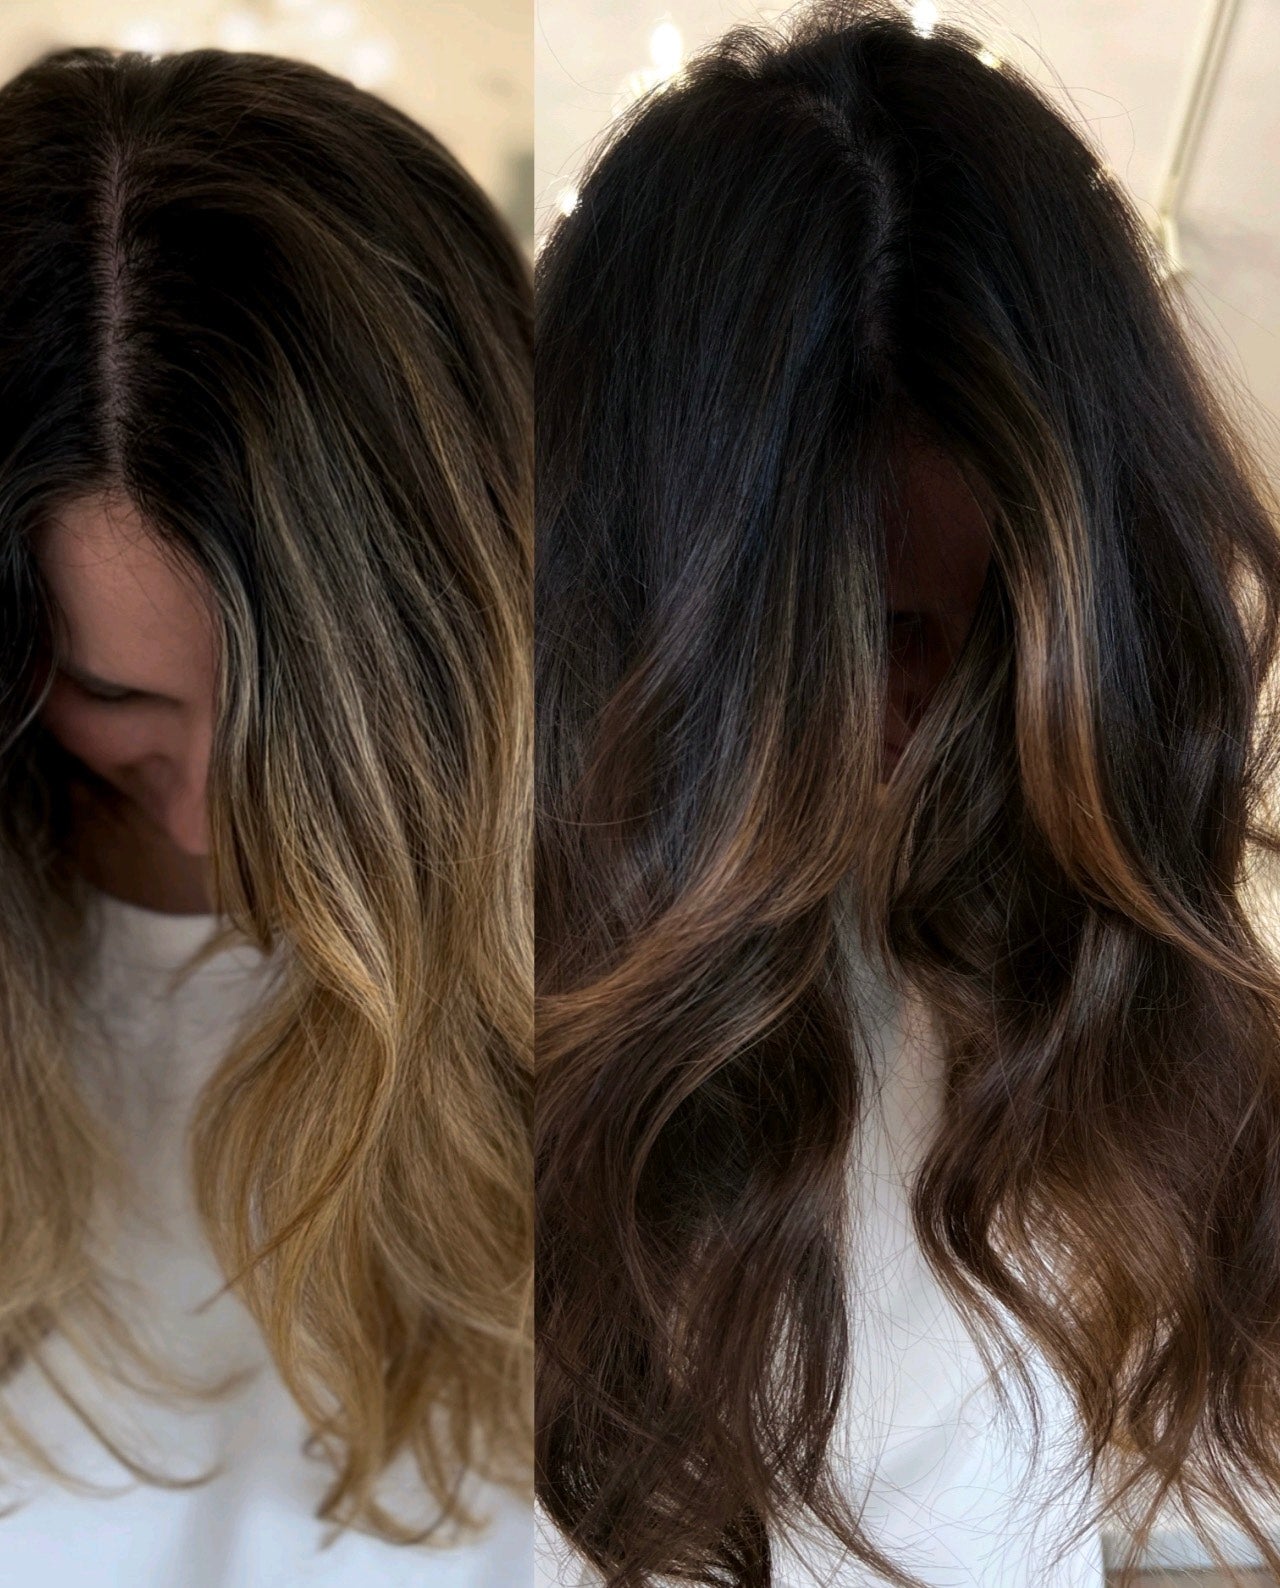
HOW TO CREATE A MOODY BRUNETTE ON PRE-LIGHTENED HAIR
One of the most common issues with bringing brunettes closer to their natural is the chance of a bland color. It is super easy to make this look flat and also cause shock to your client. Most clients who have seen brightness around their face for a long time are not ready to just see dark. This is important to remember, because your placement of dimension will matter.
When bringing a client back to their natural, I highly suggest leaving some brighter pieces around the face. Usually keeping these on the warmer side is the best option. Generally this hair is extremely porous and will not hold on to much tone anyways. Warmth will help keep reflection. It also does not always mean the finish will look warm, but it prevents the lighter pieces from looking dried out. Contrast must be taken into consideration here. A level 8 warm will most likely look cool next to a natural level 4.
The first step is analyzing where the hair is at. Remember that because of porosity, you will need to replace each level of underlying pigment in stages. 1 fill is usually not enough when going more than 2-3 darker. If opting for 1 fill, you risk the chance of copper overpowering your formula. This is an issue because when formulating the final formula, you will now need to accommodate for the warmth you just put back in.
Your heaviest copper formula should happen at least 2 levels above where your final gloss or formula will be. For instance, if I have level 9 highlights going back to natural level 5 , my first fill would be around a level 8 copper/red . My second formula would be around a 6/7 gold/copper . Final formula would be at a level 5 neutral/warm. You want to make sure you’re leaving enough room to avoid copper/red popping through. This obviously varies greatly depending on the finish you are looking for, but speaking of true brunette tones, this is how I would generally approach it.
Simplify the process as much as possible and utilize the tones already present in the hair. Many stylists get too aggressive with this type of situation and almost create a nightmare color correction scenario. Using a translucent demi color line will provide forgiveness. I cannot stress this ENOUGH. You may opt for a more opaque demi for the final formula, which is perfectly fine. I strongly recommend avoiding permanent color when bringing someone back. Permanent color is not “ more permanent” in this scenario. It also will create base shift, which could potentially cause a harsh grow out even if it’s matched well to the natural. The beauty of translucent demis is they fade beautifully and it’s much easier for your client to go lighter eventually. That being said, you have to be aggressive with your formulations when working with translucent color lines. They are already lighter in pigment, AND you are applying on damp hair which waters the product down.
Utilize the brightness around the face that is already there to create dimension. If needed, add a few to soften the root line ONLY around the face. Formulating an aggressive melt to break up the line of demarcation is a much better option. You can also add lowlights while melting to help break up some of the solid ends.
Formulating your melt properly is a must. I generally recommend 1-2 levels BELOW the natural of the hair when trying to mute lines of demarcation. Opt for a simply formula if you’re attempting to match the natural. Most brunettes do not have a ton of warmth peeping through in their natural. Yes, it’s always in the underlying pigments but generally you don’t see a lot of copper or red on someone. If you do, please formulate accordingly to what you are seeing for those specific situations. Using a little warmth when the highlights are lifted high is ok, but you do not want this to overpower your formula. It can cause a lot of reflection and that line of demarcation doesn’t get muted, but almost enhances it. This is the biggest mistake when melting. I generally go for an N mixed with ¼ of the formula cool or slightly warm. Mixing too many tones together will just make brown! If the natural is a level 5, you will be working with level 3 ( translucent line like Redken, Shades EQ). If incorporating a cool tone, it is ok for that tone to be a level above. If utilizing warmth, you will want to keep it at the level 3.
The process should look something like this:
- Clarify hair twice, rinse.
- Apply a protein rich conditioner to the ends and don’t rinse.
- Apply melt to damp hair ( with conditioner on) and brush through no more than 3 times.
- Make sure to apply product 1-2 inches below the line of demarcation as the brush diffuses the product.
- Apply water in a spray bottle with conditioner to the ends if the hair is drying out as you are working.
- Let melt process the full 20 minutes, rise.
- Section out the front and keep conditioner on it.
- Apply fill #1, rinse.
- Apply fill #2, rinse.
- Apply global gloss, formulating separately for the tone you would like the front of the hair to be!
- Shampoo, and PH balance the hair
There are many ways to approach this type of color transformation! I find this process the easiest and most comfortable for the client and their hair. It allows them freedom to eventually shift their tone again.
The above color was created using these Redken Shades EQ formulas:
FIll #1 - 08C & 08GG
Fill #2- 07NB & 06WG
Global gloss- 05N & 05NW
Jump on in to my Formulation Foundation classroom for a 40 minute intense class that will teach you my EXACT blueprint to formulate a gloss properly. It will change the way you formulate forever for just $29. Click on the link below!